Follow Me on Pinterest

Monday, December 9, 2013

Elfie's Vacation...even elves need time off!

Our family traveled to Arizona to take a ride on The Polar Express. Olive's elf made a surprise visit while we were on vacation.


Elfie must have known Olive was going to ride the Polar Express!


Elfie found us in Arizona! 
I'm sure she went sight seeing while we were on the Polar Express!

All aboard! The Polar Express!


The North Pole: 
Now we know where Elfie and Santa live!

I wonder what Elfie will be up to this week??

Tuesday, December 3, 2013

Elfie's Adventures...


Elfie has been all over our house, causing all sorts of mischief and fun!


She brought Olive a very special Christmas countdown calendar on the first of December!

She found time for a WOD.
(Endurance and upper body strength is crucial for flying back and forth to the North Pole every day!)


 ...and a not so Paleo snack!


Giddy up! Who needs a chimney when you can enter through the "kitty door!" (a.k.a. doggy door that only our cat used)


Wrong holiday Elfie...


Even elves oversleep! Oops!


Elfie is one busy elf lady!

Tuesday, November 26, 2013

'Tis the Season for Elf Mischief!


Elf season is here and I would be lying if I said I wasn't excited! Our family started the elf in our house last year and it has been a blast for me and Olive! 
I have a lot of fun staging Elfie, and Olive loves to find her every morning. I find a lot of my ideas from Pinterest and mom friends. Some of the adventures Elfie goes on are pretty elaborate and sometimes they aren't. I just try to have fun with it! 

Here are some of my favorites from last year:
Elfie went fishing in our fridge.
(blue jello, swedish fish, a candy cane and yarn.)

She hid in Olive's stuffed animal bucket. The paper mustache helped her blend in.

Elfie brought Olive chocolate milk from the North Pole. She stayed warm with ear muffs and a scarf!

Elfie went camping on our kitchen counter. She built a marshmallow snowman and stayed warm by the candle campfire and roasted mini marshmallows.

This is my favorite from last year! I saw an elf bench pressing marshmallows on Pinterest and took it a few steps further. Elfie's WOD: Burpees, marshmallow carries, wallballs, licorice double unders, chocolate abmat sit ups, and Oreo push press. She's one buff elf!

My sister and I were out and about on Saturday when my phone rang. My sister answered (I was driving and we were lost. The last thing I needed to do was talk on the phone!). "I FOUND ELFIE!" Oh (bleep)! Mommy fail...Little did Olive know, she didn't actually find her elf, she found my classroom elf. I didn't know how to explain why there was an elf in my work bag so Elfie reported for duty a week early.
 

Stay tuned for Elfie's adventures this year!


Monday, July 29, 2013

Scrapbooker Problems


Have you ever noticed how difficult it is to get a lot of use out of those chipboard letter packs from craft stores? It seems like I am constantly buying a new pack because I'm one letter short. 

 While looking through my scrapbook supplies I noticed an abundance of mismatched chipboard letters and decided to put them to good use. 

All you need is an empty (and clean) can, glue gun, spray paint, and chipboard letters. (Yep, it's as easy as it sounds!)


Notice the mismatched letters?? It's okay! You are going to spray paint right over them!...Woo-hoo!

Use your hot glue gun and glue the letters. I used a lot of glue to make sure they really stuck. Be sure to remove the glue "hair" before painting. And don't burn your finger like I did...ouch!

Olive was my photographer! She had a lot of fun taking pictures for me. She's talented! :)


Now it's time to paint! 

It was the perfect day to spray paint because there was absolutely no sign of a breeze...until I stepped outside to paint. Ugh! Of course the only time a cool breeze shows up in July would be when I am getting ready to use spray paint!! Oh well, I did it anyway and went to the gym with purple paint on my arms. I was not going to let a little wind stop me from finishing this project! (determination or stubbornness?? I'm not sure.)

I sprayed the can upside down because I didn't want to paint inside.


Olive wanted to pose with her new chalk can!

Now, what else can I glue chipboard to and spray paint??

~Meghan

Monday, July 15, 2013

I think I will put one on every wall...


We have really awesome high ceilings with a lot of wall space in our home, but they aren't so awesome when the walls are bare! I would love to decorate our walls without going broke. Big pieces tend to be expensive and I have a lot of space to cover.
I was shopping at a craft store when I stumbled upon this awesome (and BIG!) monogram F. The best part is it was on sale...SCORE! I brought it home where it sat on my craft table, a.k.a. the table where I put anything and everything that could be used in a future d.i.y. project. It sat there for weeks (months, maybe) while I thought about the best way to make it snazzy. Should I paint it? Use scrapbook paper? Tissue paper? Wrapping paper?? After too much thought I decided to use fabric and Mod Podge...two things I have very little experience using. Lucky for me, everything turned out just right! I just might put an "F" in every room in our home (I'm kind of kidding...)

Materials:
Monogram
Mod Podge
Fabric & Scissors
Paint & Brush
Sawtooth Picture Hangers
Paint a medium coat of Mod Podge on your fabric. This makes the fabric stiff and easier to work with. It also prevents fraying. Let it dry for an hour or two.
P.S. Walmart sells these 18 in. x 21 in. fabric singles for less
 than a buck!! 
 
 
While you wait for the fabric to dry paint the edges of your monogram. I am super indecisive and bought 3 different colors. I'm glad I did because I ended up really unhappy with this gold color; it looked too funky with the fabric (see pictures below). In the end I chose to paint the edges teal and was a lot happier! 
Enough with my project mishaps and on to step 2: paint! Apply 2 coats (wait about an hour in between coats: cook dinner, run errands, work out...multi task!)
Now that the paint and fabric are dry (and you've crossed a few things off your to-do list) you're ready for step 3: trace. I used a carpenter's pencil and wiped away any markings left of my monogram. Trace on the back of the fabric. You don't want markings to show after all your hard work. 
 
Hindsight is 20/20: trace first; paint second that way you don't 
have to worry about pencil on your letter because the paint will cover it! That's my DUH! Moment...

Cut along the lines. It helps to have a three year old hold the fabric tight with her stinky feet! :)


Now it's time to glue the fabric. First, apply a heavy coat of Mod Podge...
Then, cover the monogram with the fabric and slather it up with some more Mod Podge (a light coat this time). Pay special attention to the edges and make sure you really glue them down.
Let it dry over night before installing the picture hanging hardware. I purchased hammer in hardware and followed the directions on the back of the package (place and hammer...)
 

I found these picture frames packed away and decided to make a photo collage.
 
One wall finished, several more to go!
~Meghan


Sunday, July 7, 2013

Bibbity Bobbity Boo!


My journey to make Olive's room the coolest in the house began a few months ago. I wanted to create a fun space for her to play, create, and sleep!  Up until a little bit ago, Olive would only venture to her room to poop! (TMI??). We'd hear her door shut and knew exactly what she was up to. I am happy to report that is no longer the case (thanks in part to the poop jar). 

I have spent most of my summer break turning her room into a fun space. Not to toot my own horn, but now that this project is complete, I feel like I have achieved my goal: Olive LOVES playing (not pooping!) in her room!!! (TOOT! TOOT!)

Little miss Olive loves to play dress up, but her costumes were everywhere throughout our house! Every where you looked you'd find a tutu, tiara, necklace, princess shoe, or magic wand! I can't tell you how many times I accidentally stepped on her tiara. Talk about painful! I needed to solve this dress up nightmare! I needed to find a way to store Olive's dress up clothes so she could easily locate everything AND easily put it away. I decided to make a costume rack to go with her princess shoe rack. It is really easy to make and pretty inexpensive (I paid 15 bucks for materials)! 

I bought an ugly, brown 2' x 4' pegboard from Lowe's for less than 5 bucks! I used the purple paint (from the princess shoe rack project) to make it pretty! I applied two coats over a 24 hour period and painted a top coat of Polycrylic to protect against scratches.
I also purchased a variety pack of peg hooks which came with spacers, screws, 27 hooks, and the little plastic things to secure the hooks. Basically, it came with everything you need for a costume rack and it cost less than $3! I realized I hadn't taken a picture of the peg hook package after all of the costumes were up.  I took a picture of the leftover materials...sorry! 
My handy hubby helped me attach the pegboard to the wall. It helps to have another person on this step. It's a little difficult (but not impossible) to hold the spacer between the wall and pegboard while screwing it to the wall.
Once the pegboard is secured to the wall you can begin inserting the hooks. Don't secure the hooks until you are sure they are all in the right place. They aren't difficult to remove, it's just a pain in the butt to move them after you have the hooks secure (yes, I'm speaking from experience!).


Olive loves her costume rack and I love not stepping on tiaras!

Enjoy!

~Meghan

"Laughter is timeless. Imagination has no age. Dreams are forever!"-Tinkerbell


Materials:
  • 5x7 picture frame
  • 5X7 card stock
  • alphabet stamps
  • ink

After a very busy couple of weeks, I finally found some time to get crafty! I thought it would be the perfect time to make something cute for Olive's room AND use my new stamps...

This project is quite simple...The most difficult part for me was finding the perfect quote. (This would be step 1: find words to stamp on your paper)! I found several that I really liked. I ended up choosing Tinkerbell's quote, "Laughter is timeless. Imagination has no age. Dreams are forever!" Olive LOVES Tink! There's a fairy "trap" hanging in her room and we've "caught" Tinkerbell twice (I'll save that story and "how-to" for a later blog post). Plus, isn't it every mom's wish for their child to always chase their dreams??? Perfect!


Step 2: Cut a 5x7 piece of card stock. I used a blank card and cut it in half.

Step 3: Get to stampin'! Keep a damp Q-tip handy to wipe ink off the edges of the stamp. It might be wise to practice on scrap paper first. It took me several tries (and cards!) to get in my stampin' groove. 

I spent HOURS coming up with a design that I loved. I experimented with glitter, markers, various fonts, etc. At one point I even considered typing the dang thang! Finally, I chose to only use stamps and am really happy with how it turned out! 

Step 4: Insert in the frame and enjoy! I trimmed the white card stock and glued it on purple paper to jazz it up a bit!

Here's what it looks like without all of the fancy photo edits:
Still cute, right?

It's hanging right above Olive's costume rack; the perfect place for her imagination to come to life!

Enjoy!

~Meghan

Tuesday, June 25, 2013

What the Poop??

Poop is a word that brings giggles to Olive and chills down my spine! Poop: Icky. Yucky. Stinky. Smelly. Gross. Poop! I admit it...my frustration with poop is all my own doing. I started potty training Olive before she was ready (hindsight is 20/20, right??). She turned two and the thought of not spending money on diapers and wipes excited me beyond belief! Turns out I was the only one excited about no more diapers... Olive was so not ready; I stopped "potty training" after about two weeks. Everyone kept saying, "Olive will let you know when she's ready!" and those experienced parents were right. It seems like she woke up one day and decided she was ready for the potty. She even decided she no longer wanted to sleep in diapers. Whew! What a relief! OLIVE WAS POTTY TRAINED! HOORAY! NO MORE DIAPERS AND WIPES! NO MORE YUCKY CHANGING STATIONS!...boy, I was so wrong! 

Here we are, two months after Olive decided to pee in the potty, and she will not poop in the potty! Well, let me rephrase that: Olive will only poop in the potty when I catch her in action and run her to the toilet...not my idea of fun! It's quite the opposite actually. Screaming, crying, kicking... 

Brian (my hubby) and I backed off for a bit, thinking that maybe she needed more time. Maybe she's just not ready to poop on the potty, maybe she will wake up one day and decide she's tired of going potty in her underwear...It's not working.

Olive starts preschool in September (two months away) and she must be completely potty trained in order to attend school...yikes! I've been thinking a lot about the best way to help her poop on the potty. I want to make pooping fun. I want to keep it positive. I want her to feel successful each time she makes it to the potty...
Today I finally came up with the idea of a "poop jar." Every time Olive poops in the potty, she gets to pick a special bead and put it in her jar. When the jar is full she gets to open a special present. (I have seen similar ideas used in the classroom to reward classroom behavior, and I have seen it on the internet to reward behaviors at home.)

It is super simple to make and inexpensive. 

Materials:
*jar/small container
*beads, jewels, or other objects to fill the jar
*alphabet stickers


Use the alphabet stickers to label the jar. 
I chose "poop" because I am using this as an incentive to poop in the potty. 
You can use it however you choose (sleeping in your own bed, using kind words, etc,)


Place the jar and beads near the potty.
 Every time Olive poops in the potty she gets to choose a bead to add to the jar. 
When the jar is filled (to the ribbon), she gets a surprise present. 

I want to get Olive excited about her poop jar, so I showed her the bag of beads. I pointed out my favorite one and she showed me hers (the purple butterfly). I took her to the potty a few times today to remind her about the beads. 
She seems super excited about getting a bead for using the potty (she keeps saying, "I going to get the purple butterfly when I go poop on the potty!")...

No poop actually took place today.
 I filled the jar with beads to give you
the idea of what it is supposed to look like!

Fingers crossed!!!

~Meghan

Saturday, June 22, 2013

Every princess needs a hockey stick, fish purse, and a shoe rack!


Happy Saturday!
Like most of you, I LOVE Pinterest and many (okay...ALL) of my ideas come from things I find on that site. I don't reinvent the wheel; I make it work for me. With that said, a few weeks ago I came across this really neat idea to use crown molding as a shoe rack. I thought it was quite clever but I would need an entire wall of that stuff to fit all the shoes I own!! AND most of my shoes are flats, flip flops, or wedges...not something that can be hung. That awesome idea just wouldn't work for me...BUMMER!

Then, I was putting Olive to bed the other night and I tripped over a pile of her plastic princess high heels. BAM! The princess shoe rack idea was born....GENIUS!

I headed over to Lowe's, which is quickly becoming one of my favorite places to shop, and perused the crown molding aisles (yes, that's plural...there are aisles of crown molding! SO much to choose from, different colors, sizes, styles, etc.) I found a 1x1x2 inch Poplar piece of crown molding (under two bucks, score!) and a jar of sample paint (under three bucks!).


I lightly sanded the edges of the wood; just enough to get any splinters off and painted away! I was outside in 80+ degree heat so the paint dried quickly. I only applied one coat (LOVE Valspar paint!).

 Disclaimer: So...I would be lying if I said this entire project was d.i.y. for me. The remainder of the steps was more like d.i.w.t.h.o.y.d. (Do It With The Help of Your Dad!)


We (and by "we" I mean "he") drilled the shoe rack into the wall! 
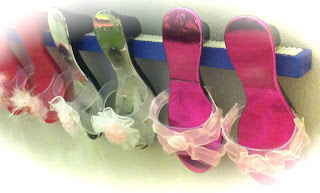
Tip: Glue a strip of shelf liner on the shoe rack
so the princess heels don't slip off!
Tah-Dah! A shoe rack fit for a princess!!!

To complete Olive's princess dress up area, I added these hooks for her purses! These were super simple to install, just peel and stick (hence the name "Stick On!")! 

Olive loves her new princess play area! As soon as her shoes and bags went up (yikes! she has her mommy's love of shoes!), she put on every tutu she owns and danced around the house! 

LOVE, LOVE, LOVE my little princess! 

~Meghan