Wife. Mommy. CrossFit Enthusiast. Crafter. Need I say more?
Showing posts with label princess dress up. Show all posts
Showing posts with label princess dress up. Show all posts
Sunday, July 7, 2013
Bibbity Bobbity Boo!
My journey to make Olive's room the coolest in the house began a few months ago. I wanted to create a fun space for her to play, create, and sleep! Up until a little bit ago, Olive would only venture to her room to poop! (TMI??). We'd hear her door shut and knew exactly what she was up to. I am happy to report that is no longer the case (thanks in part to the poop jar).
I have spent most of my summer break turning her room into a fun space. Not to toot my own horn, but now that this project is complete, I feel like I have achieved my goal: Olive LOVES playing (not pooping!) in her room!!! (TOOT! TOOT!)
Little miss Olive loves to play dress up, but her costumes were everywhere throughout our house! Every where you looked you'd find a tutu, tiara, necklace, princess shoe, or magic wand! I can't tell you how many times I accidentally stepped on her tiara. Talk about painful! I needed to solve this dress up nightmare! I needed to find a way to store Olive's dress up clothes so she could easily locate everything AND easily put it away. I decided to make a costume rack to go with her princess shoe rack. It is really easy to make and pretty inexpensive (I paid 15 bucks for materials)!
I bought an ugly, brown 2' x 4' pegboard from Lowe's for less than 5 bucks! I used the purple paint (from the princess shoe rack project) to make it pretty! I applied two coats over a 24 hour period and painted a top coat of Polycrylic to protect against scratches.
I also purchased a variety pack of peg hooks which came with spacers, screws, 27 hooks, and the little plastic things to secure the hooks. Basically, it came with everything you need for a costume rack and it cost less than $3! I realized I hadn't taken a picture of the peg hook package after all of the costumes were up. I took a picture of the leftover materials...sorry!
My handy hubby helped me attach the pegboard to the wall. It helps to have another person on this step. It's a little difficult (but not impossible) to hold the spacer between the wall and pegboard while screwing it to the wall.
Once the pegboard is secured to the wall you can begin inserting the hooks. Don't secure the hooks until you are sure they are all in the right place. They aren't difficult to remove, it's just a pain in the butt to move them after you have the hooks secure (yes, I'm speaking from experience!).
Olive loves her costume rack and I love not stepping on tiaras!
Enjoy!
~Meghan
Saturday, June 22, 2013
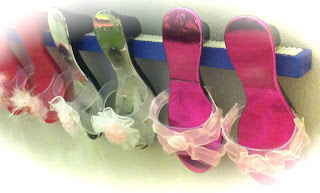
Every princess needs a hockey stick, fish purse, and a shoe rack!
Happy Saturday!
Like most of you, I LOVE Pinterest and many (okay...ALL) of my ideas come from things I find on that site. I don't reinvent the wheel; I make it work for me. With that said, a few weeks ago I came across this really neat idea to use crown molding as a shoe rack. I thought it was quite clever but I would need an entire wall of that stuff to fit all the shoes I own!! AND most of my shoes are flats, flip flops, or wedges...not something that can be hung. That awesome idea just wouldn't work for me...BUMMER!
Then, I was putting Olive to bed the other night and I tripped over a pile of her plastic princess high heels. BAM! The princess shoe rack idea was born....GENIUS!
I headed over to Lowe's, which is quickly becoming one of my favorite places to shop, and perused the crown molding aisles (yes, that's plural...there are aisles of crown molding! SO much to choose from, different colors, sizes, styles, etc.) I found a 1x1x2 inch Poplar piece of crown molding (under two bucks, score!) and a jar of sample paint (under three bucks!).
I lightly sanded the edges of the wood; just enough to get any splinters off and painted away! I was outside in 80+ degree heat so the paint dried quickly. I only applied one coat (LOVE Valspar paint!).
Disclaimer: So...I would be lying if I said this entire project was d.i.y. for me. The remainder of the steps was more like d.i.w.t.h.o.y.d. (Do It With The Help of Your Dad!)
We (and by "we" I mean "he") drilled the shoe rack into the wall!
 |
| Tip: Glue a strip of shelf liner on the shoe rack so the princess heels don't slip off! |
Tah-Dah! A shoe rack fit for a princess!!!

To complete Olive's princess dress up area, I added these hooks for her purses! These were super simple to install, just peel and stick (hence the name "Stick On!")!
Olive loves her new princess play area! As soon as her shoes and bags went up (yikes! she has her mommy's love of shoes!), she put on every tutu she owns and danced around the house!
LOVE, LOVE, LOVE my little princess!
~Meghan
Subscribe to:
Posts (Atom)


