Follow Me on Pinterest

Tuesday, June 25, 2013

What the Poop??

Poop is a word that brings giggles to Olive and chills down my spine! Poop: Icky. Yucky. Stinky. Smelly. Gross. Poop! I admit it...my frustration with poop is all my own doing. I started potty training Olive before she was ready (hindsight is 20/20, right??). She turned two and the thought of not spending money on diapers and wipes excited me beyond belief! Turns out I was the only one excited about no more diapers... Olive was so not ready; I stopped "potty training" after about two weeks. Everyone kept saying, "Olive will let you know when she's ready!" and those experienced parents were right. It seems like she woke up one day and decided she was ready for the potty. She even decided she no longer wanted to sleep in diapers. Whew! What a relief! OLIVE WAS POTTY TRAINED! HOORAY! NO MORE DIAPERS AND WIPES! NO MORE YUCKY CHANGING STATIONS!...boy, I was so wrong! 

Here we are, two months after Olive decided to pee in the potty, and she will not poop in the potty! Well, let me rephrase that: Olive will only poop in the potty when I catch her in action and run her to the toilet...not my idea of fun! It's quite the opposite actually. Screaming, crying, kicking... 

Brian (my hubby) and I backed off for a bit, thinking that maybe she needed more time. Maybe she's just not ready to poop on the potty, maybe she will wake up one day and decide she's tired of going potty in her underwear...It's not working.

Olive starts preschool in September (two months away) and she must be completely potty trained in order to attend school...yikes! I've been thinking a lot about the best way to help her poop on the potty. I want to make pooping fun. I want to keep it positive. I want her to feel successful each time she makes it to the potty...
Today I finally came up with the idea of a "poop jar." Every time Olive poops in the potty, she gets to pick a special bead and put it in her jar. When the jar is full she gets to open a special present. (I have seen similar ideas used in the classroom to reward classroom behavior, and I have seen it on the internet to reward behaviors at home.)

It is super simple to make and inexpensive. 

Materials:
*jar/small container
*beads, jewels, or other objects to fill the jar
*alphabet stickers


Use the alphabet stickers to label the jar. 
I chose "poop" because I am using this as an incentive to poop in the potty. 
You can use it however you choose (sleeping in your own bed, using kind words, etc,)


Place the jar and beads near the potty.
 Every time Olive poops in the potty she gets to choose a bead to add to the jar. 
When the jar is filled (to the ribbon), she gets a surprise present. 

I want to get Olive excited about her poop jar, so I showed her the bag of beads. I pointed out my favorite one and she showed me hers (the purple butterfly). I took her to the potty a few times today to remind her about the beads. 
She seems super excited about getting a bead for using the potty (she keeps saying, "I going to get the purple butterfly when I go poop on the potty!")...

No poop actually took place today.
 I filled the jar with beads to give you
the idea of what it is supposed to look like!

Fingers crossed!!!

~Meghan

Saturday, June 22, 2013

Every princess needs a hockey stick, fish purse, and a shoe rack!


Happy Saturday!
Like most of you, I LOVE Pinterest and many (okay...ALL) of my ideas come from things I find on that site. I don't reinvent the wheel; I make it work for me. With that said, a few weeks ago I came across this really neat idea to use crown molding as a shoe rack. I thought it was quite clever but I would need an entire wall of that stuff to fit all the shoes I own!! AND most of my shoes are flats, flip flops, or wedges...not something that can be hung. That awesome idea just wouldn't work for me...BUMMER!

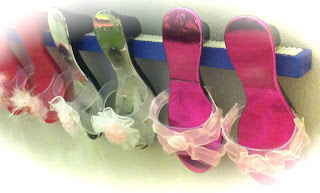
Then, I was putting Olive to bed the other night and I tripped over a pile of her plastic princess high heels. BAM! The princess shoe rack idea was born....GENIUS!

I headed over to Lowe's, which is quickly becoming one of my favorite places to shop, and perused the crown molding aisles (yes, that's plural...there are aisles of crown molding! SO much to choose from, different colors, sizes, styles, etc.) I found a 1x1x2 inch Poplar piece of crown molding (under two bucks, score!) and a jar of sample paint (under three bucks!).


I lightly sanded the edges of the wood; just enough to get any splinters off and painted away! I was outside in 80+ degree heat so the paint dried quickly. I only applied one coat (LOVE Valspar paint!).

 Disclaimer: So...I would be lying if I said this entire project was d.i.y. for me. The remainder of the steps was more like d.i.w.t.h.o.y.d. (Do It With The Help of Your Dad!)


We (and by "we" I mean "he") drilled the shoe rack into the wall! 
Tip: Glue a strip of shelf liner on the shoe rack
so the princess heels don't slip off!
Tah-Dah! A shoe rack fit for a princess!!!

To complete Olive's princess dress up area, I added these hooks for her purses! These were super simple to install, just peel and stick (hence the name "Stick On!")! 

Olive loves her new princess play area! As soon as her shoes and bags went up (yikes! she has her mommy's love of shoes!), she put on every tutu she owns and danced around the house! 

LOVE, LOVE, LOVE my little princess! 

~Meghan

Wednesday, June 19, 2013

Have I mentioned how much I LOVE chalkboard paint??

Hello again! I have officially been on summer break for one week! Woo-hoo! I have been busy with projects around the house (and enjoying every minute of it!). One of my favorite projects I've completed this week is making a dresser for Olive using chalkboard paint and this plastic storage bin. It's inexpensive and easy to do!


Start with this (BORING!):


        Use painter's tape to mark the area you want to paint:


 You know how Rachael Ray doesn't like to measure when she bakes?? Well, I don't like to measure when I d.i.y. I prefer to "eyeball it." It adds character when things aren't perfectly perfect! (If you really feel the need to measure to make sure your rectangles are exact, then go right ahead...I won't judge you!!)

 Apply several coats of chalkboard paint:


 I applied 3 thin coats on day one and a fourth coat the next day.
Let it dry for 24 hours after your final coat of paint.
Be really careful when peeling the painter's tape off!!

Label with chalk:


Tah-Dah! The boring storage bin is transformed into a cute dresser, perfect for a toddler's room!
~Meghan


Sunday, June 16, 2013

Recent projects

Here are a few projects I started before I had the courage to start this blog. There aren't any before and after photos or steps. I have to start somewhere, right??
 Chalkboard paint is my new obsession! I will be using it a lot this summer!
 Olive's book shelves made from vinyl rain gutters. My teaching partner gave me this idea and I am in love. I plan on doing this in my classroom next year!
Father's Day 2013. I also made one for Olive's Papas. Now I have 3 wooden letters, D A and P and I'm not sure what to do with them! Ideas??

If I can do it, anyone can!

Welcome! 

A few months ago I got this "brilliant" idea to start a blog about being a mommy, a mommy who enjoys trying to be crafty. There is just one little problem (okay, one BIG problem)....I'm no Martha Stewart! I used to scrap book frequently. I made our Christmas cards once (and they were very cute!) I made invites for my daughter's first and second  birthday parties (again, the invites were super cute!). I love creating, but I would not consider myself a crafting guru. I have found it difficult to manage my time in order to complete the awesome projects I spent countless hours pinning on my Pinterest boards. 

For weeks and weeks I pushed my "blog wish" out of my head. I can't do it, I don't have time. I can't do it, I'm not crafty enough. I can't do it, what would I say?? These negative thoughts  raced through my head!  
And then rule #6 came into my life... I was sitting in my Instructional Leadership class ( I don't have enough on my plate so I decided to go back to school to get a masters...she says sarcastically) and the phrase "remember rule #6" came up in a video. What is rule #6 you ask? Rule #6 states: "Don't take yourself too seriously."

And here I am...not taking myself too seriously. I am not the perfect crafter, or writer, or mother, or wife, or teacher, but you get one shot at life and if crafting makes me a happier person, then crafting is what I shall do! I do not know where this blog is going to take me. I do know that I am going to hang on, enjoy the journey, and keep rule #6 in the back of my mind!!  If I can do it, anyone can!